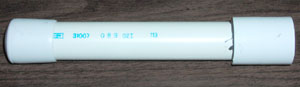
Fig.2
The first task is to make the lower bends in the coat-hanger wire. Start by making the lower end loop first followed by the loop that goes around the lower book screw. This second loop needs to be tight enough to prevent too much flopping around but slack enough so that it does not bind on the book screw. Take care to make the bends in the correct orientation. Once the bends are made test fit the wire into the PVC tube. The wire should 'just' touch either side of the tube across the diameter (see Fig.1 on the previous page) but should not be so tight that it prevents the wire from sliding easily. Adjust the bends in the wire until you achieve the correct fit and then remove the wire from the tube. Using a file and/or emery cloth remove all burrs and sharp edges from the wire. File a radius on the end of the wire on the lower loop so that it cannot 'hang-up' on the slot which will be added to the tube later.
Mark the location of the lower book screw hole on the outside of the PVC tube with a pencil. Position the wire on the outside of the tube so that the inner edge of the upper curve of the full loop is on the mark and check to ensure the bottom loop does not protrude past the bottom of the pipe. If it does, adjust either the position of the hole or the distance between the loops in the wire so that the wire does not protrude beyond the bottom of the pipe.
Once the hole location has been established drill a hole straight though the PVC tube. The hole should be one drill size larger than the diameter of the book screw. Make sure the drill is kept perpendicular to the tube (in both directions) at all times.
Temporarily fit a book screw into the hole and position the wire on the outside of the PVC tube so that the full loop is over the book screw. Hook one end of the tension spring onto the upper curve of the full loop. Note: If your tension spring has closed loops you may have to thread the spring onto the wire and work it around to the upper curve.
Apply a little tension to the spring so that the bottom of the closed loop is held firmly against the book screw and then mark the position of the upper spring hook/loop on the outside of the tube. Once the location is established transfer the mark 90° around the outside of the PVC tube.
While the wire is still on the book screw, with the bottom of the closed loop held firmly against the screw, mark the location of the end of the wire on the lower loop on the outside of the PVC tube with a pencil. Now make another mark 1/4" closer to the bottom of the tube. Ensure that the marks line up with the lower book screw hole. This will be the location of the slot described in Step 4.
Remove the wire and book screw and then drill a hole straight though the PVC tube at the marked location for the upper book screw. Make sure the drill is kept perpendicular to the tube (in both directions) at all times and that this second hole is 90° around the pipe from the first hole.
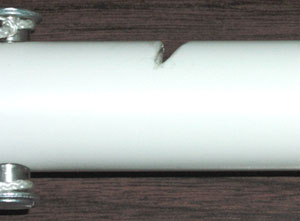
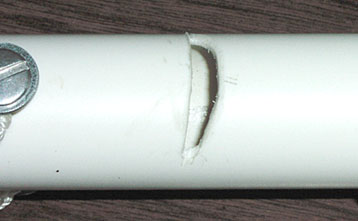
Using a hacksaw cut a slot into the PVC tube at the lower of the two marks made in Step 3. The slot should be perpendicular to the tube and the depth should not exceed 1/3 of the diameter of the pipe. Make a second slot 3/16" away (towards the bottom of the tube) but this time tip the saw to roughly 45° so that the two slots meet (see Fig 2 below). Use the tip of an Exacto knife to remove any burrs on the plastic.
Fig.2
Now we can start assembling the dropper mechanism.
Temporarily insert a book screw through one of the holes in the PVC tube and screw it together. While holding one end of the book screw against the tube measure the distance between the opposite end of the screw and the tube. Divide this distance in half and add 1/16". Now cut four pieces of small bore PVC tubing to this dimension. Remove the book screw from the tube.
Place a washer onto the cylindrical half of a book screw followed by one piece of the PVC tubing.
Hook one end of the tension spring onto the upper curve of the full loop of the wire (again if your tension spring has closed loops you may have to thread the spring onto the wire and work it around to the upper curve). Insert the wire and spring into the PVC tube ensuring that you insert it from the top of the tube. Thread the cylindrical portion of the book screw that has the washer and tube in place through the upper hole in one side of the PVC tube, through the hook/loop in the top of the spring and out through the opposite hole in the PVC tube. Press another piece of the PVC tubing onto the cylindrical portion of the book screw and place a washer on the threaded part. Screw the book screw together so that the two pieces of PVC tubing are slightly compressed and the tension will prevent the screw from accidentally coming undone in use.
Prepare the cylindrical section of the second book screw with a washer and a piece of PVC tubing in the way described above. Press on the upper end of the wire to extend the spring and look through the lower book screw hole to ensure that the loop in the wire is correctly positioned on either side of the hole. Once it is correctly located push the prepared cylindrical section of the book screw through the lower hole, wire loop and out through the opposite hole. Again press another piece of the PVC tubing onto the cylindrical portion of the book screw and place a washer on the threaded part then screw the book screw together.
You can now test the mechanism to make sure it works correctly.
Press on the end of the wire so that the end of the lower loop is no longer visible though the slot at the bottom of the PVC tube. Take something with a ring on it (like a set of keys) and insert it into the slot and release the wire. The spring should pull the wire back up and lock the ring into position. Hold the dropper mechanism in the vertical position and press on the end of the wire coming out of the top of the PVC tube. If everything is correct the ring should be released and the keys (or whatever you used) will fall from the slot.
If it does not work correctly go over the above steps paying particular attention to the way the bends are made. Correct any mistakes and test the dropper again.
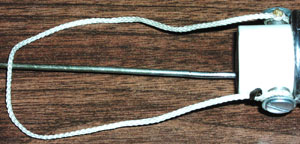
Take the shorter length of 50# braided Dacron line and tie one end around the PVC tubing on one side of the lower book screw. Repeat with the other end of the line on the opposite side (see Fig. 3 below). This loop forms the attachment point for the para bear's ripcord.
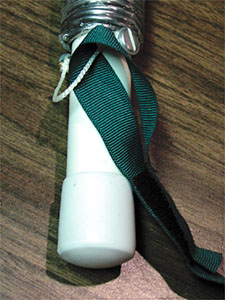
Fig. 3
The knots I use for this are simple slip knots. Prepare the ends of the line first by melting them with a cigarette lighter and pressing the molten blob against the side of the lighter body. This will produce a bell shaped 'flare' that will prevent the line pulling through the knot. The method for tying the knot is shown below in Fig. 4.
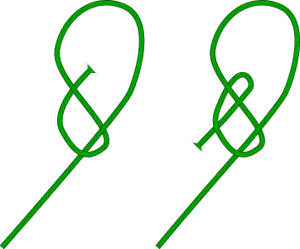
Be sure to work the flared end close to the knot and pull it tight to lock.
Take the longer length of 50# braided Dacron line and repeat Step 8 on the upper book screw. This line should be long enough so that you can easily tie a Lark's Head knot in the middle of the length. See Fig. 5 below for details.
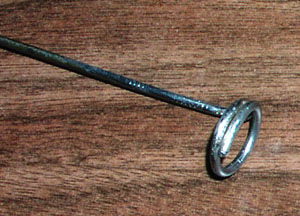
Stretch the line you just tied to the upper book screw towards the upper end of the wire coming out of the PVC tube. Make a mark on the wire 2" higher than the highest point of the line and start to form a ring in the wire at this point. The ring should be large enough to allow a Figure 8 knot in the end of the lifting line to pass through but small enough to fit through the centre of the 3/4" PVC pipe nipple. Once you have established the correct size make 1-1/2 complete turns in the wire (see Fig. 6 below). Once the turns are complete cut off the excess wire and using a file/emery cloth remove any sharp edges.
Take one of the rubber furniture feet and test fit it onto the bottom of the PVC pipe. If it is too tight (as mine were) you will have to soak it in very hot water for a couple of minutes to soften/expand it and then press it firmly onto the bottom of the PVC tube. If it is too slack you may have to use glue or add a wrap or two of electrical tape to the bottom of the tube before pushing the cap on. The cap prevents dirt and/or sand from entering the tube when it lands on the ground.
I found with my MK 1 version that I had a problem where the line was heavier than the dropper when the dropper had released the para bear and getting the dropper back to the ground took a lot of line jiggling and cursing! I have since solved the problem by adding some extra weight to the dropper. Take the 1/8" diameter plumbers solder and starting at the upper book screw wind close turns of solder towards the lower book screw. Once you reach the lower screw start winding a second layer back towards the upper screw. I found that two layers of solder was enough to solve the weight problem for my line but you may have to add more or less depending on the weight of the line you use to lift the dropper. Once you have the desired weight cut off the excess solder and wrap the entire outer surface of the solder with 2" wide clear packaging tape. I gave mine two complete wraps for security. The tape stops the solder from unwinding and also covers it so that it does not leave black marks on everything it touches.
You should now have a completed dropper mechanism that looks something like Fig. 7 below.

If you were to leave it like the above photo you would very quickly have the coat-hanger wire bent in a multitude of places from tossing it in and out of your kite bag etc. so we need to make a protective cover for it. Measure the distance from the top of the PVC tube to the ring in the end of the wire and add 1/2" to this dimension. Cut a length of PVC tube to this new dimension and glue the 3/4" PVC pipe nipple to one end. Take the remaining rubber furniture foot and stick this on the other end. You now have a protective cover for your dropper that you can push on when you have it in your kite bag. See Figs. 8 and 9 below.