I have tried several different methods of dropping para bears over the past year and have come to the conclusion that several different options need to be available according to the conditions on the day.
For days with a good ground wind and light-weight bears a wind powered messenger system works well.
For days with little to no ground wind an alternative system is required. I have tried static line droppers and while they do work I found that they do come with their own problems. The bear can get tangled on the static release line and either not release at all or the chute deploys prematurely due to the tangles pulling on the ripcord. Each bear drop also requires that the lifting kite is hauled part way down in order to attach the next bear. For our largest bear this can be a real pain as we use a 50 sq. ft. parafoil to hoist his 3.5 lbs. aloft! Pulling that beast out of the sky repeatedly on a windy day is a major work-out!
I decided that there had to be a better way of hoisting the big guy without getting him tangled up in the static line and without having to haul the foil out of the sky each time to re-attach him to the release mechanism. The results of my endeavours are shown below, a fairly simple to build but very effective release mechanism that keeps the lifter kite high in the sky where it belongs and prevents the bear from getting tangled up on the release line.
I have split the information into seperate pages so that it is easier to follow. Just click on the links below to get to the relevant page or use the buttons at the bottom of each page.
The Dropper Mechanism - see below
Dropper Mechanism Assembly Instructions
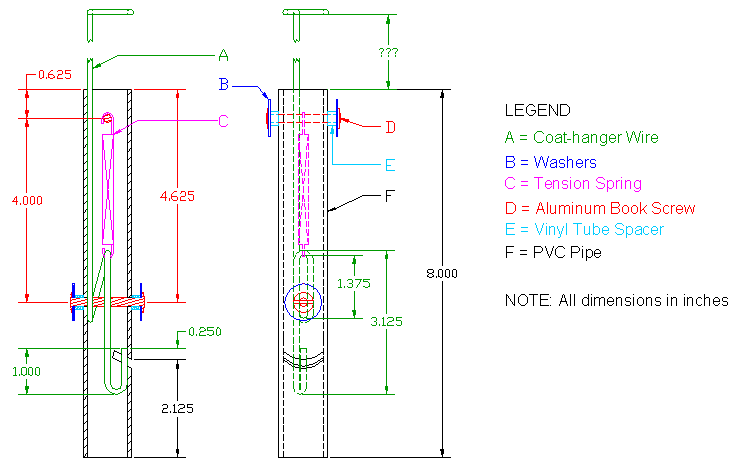
The Dropper Mechanism:
Fig. 1 shows the basic components and dimensions for building the dropper. The idea here is that you make use of whatever you have available. The dimensions are not written in stone but are simply given as a guide based on my own version. For example the dimension between the book screws may have to be altered depending upon the length and tension of your spring and the distance from the top of the tube to the ring in the wire is dependent upon the length of line used to fasten the dropper to the lifting line.
Parts List:
Here is a breakdown of the various components in Fig. 1:
A = 1 x Full length of stiff coat-hanger wire.
B = 4 x Washers with a large OD that will just fit onto the book screw.
C = 1 x Tension spring with enough tension to return the wire to its 'home' position.
D = 2 x Aluminum book screws (long enough to go through the PVC tube with some to spare).
E = 4 x Pieces of small bore PVC tube to fit on the book screws.
F = 1 x 8" length of 3/4" PVC water pipe.
Additional items not shown in Fig.1:
1 x Short length of 50# braided Dacron for ripcord attachment.
1 x Longer length of 50# braided Dacron for attaching dropper to lifting line.
1 x Length of 3/4" PVC water pipe for protective cover (length to be determined later).
1 x 3/4" PVC pipe nipple.
2 x Rubber furniture feet to fit on 3/4" PVC pipe.
1 x Length of 1/8" diameter plumbers solder (length to be determined later).
2 x 'Eyed' washing line pulleys.
2 x 3" Aluminum caribiners (the type commonly used for attaching line laundry).
2 x 3/4" Split key rings.
2 x 1-1/8" Split key rings.